Detecting differential isoform expression from RNA-seq data is one of the common transcriptome analysis tasks. And the purpose of this tutorial is to show you how to perform this analysis on Genestack platform.
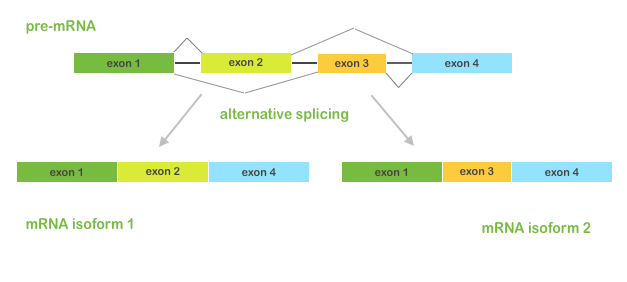 You know that in the process of alternative splicing (when different combinations of exons can be spliced together) a single gene can produce multiple mRNA and protein isoforms with different structures and biological functions. These alternative isoforms can differentially affect downstream pathways, cell growth, development and other biological processes. Therefore, it's very important to study alternative splicing events and estimate isoforms abundance in RNA-Seq datasets.
Setting up an RNA-Seq experiment
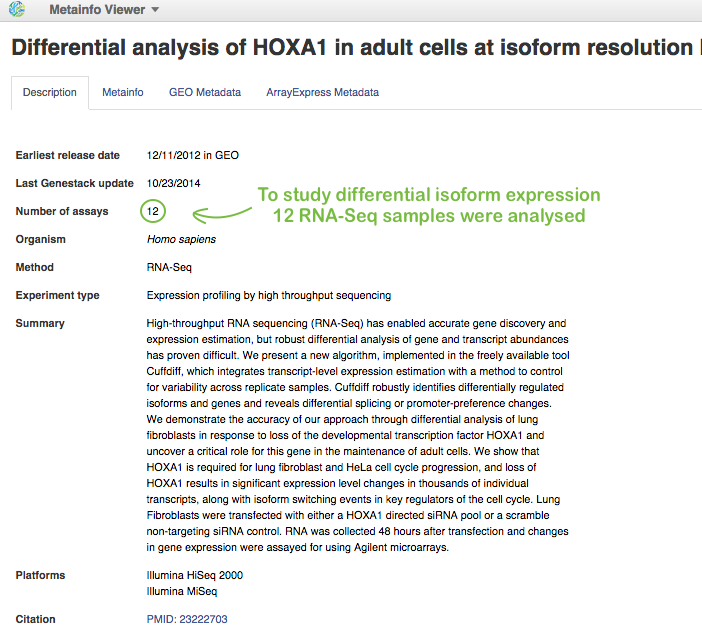
First of all, you need a nice example of differential isoform usage. For this, you can upload your own RNA-Seq samples using Data Importer or search through all public experiments we have on the platform and choose a suitable one. Our analysis will be based on RNA-seq data coming from Trapnell et al. 2012. Here is some information about this experiment opened in Metainfo Viewer:
Shortly, the authors conducted differential isoform expression analysis. They performed RNA interference (RNAi)-mediated knockdown of HOXA1 in human lung fibroblasts, where HOXA1 was depleted using a pool of HOXA1-targeting siRNAs. And they compared these HOXA1-depleted fibroblasts against cells treated with a pool of scrambled siRNAs that do not target a specific gene. Then, the authors isolated total RNA in biological triplicate and sequenced RNA on Illumina HiSeq 2000 and Illumina MiSeq platforms.
They identified differentially expressed transcripts and genes specific to cell cycle progression and related to apoptosis induction. And in this tutorial we'll try to reproduce their results.
Building an Isoform-level Differential Expression Analysis pipeline
Below is a simple dataflow to analyze one of our RNA-Seq samples. Later we'll show you how it's easy to build the same pipeline for the left 11 samples.
The dataflow consists of several steps:
- Quality control and preprocessing of raw reads
- Mapping RNA-seq reads onto reference genome
- Quality control of mapped reads
- Calculate FPKM coverage for each isoform
- Differential isoform expression analysis
Let's look at each step separately to get a better idea of what it really means.
1. Quality control and preprocessing of raw reads
Before mapping raw reads and calculation of isoform abundance, you may be interested in improving the reads quality. We offer you various preprocess applications to do some quality control checks on your raw sequence data.
Start with one sample and try to run, for example, Trim Low Quality Bases app. You'll see that each app suggests you to add next analytical step or to use relevant viewers. Look, what quality statistics you can view using Raw Reads QC Report app:
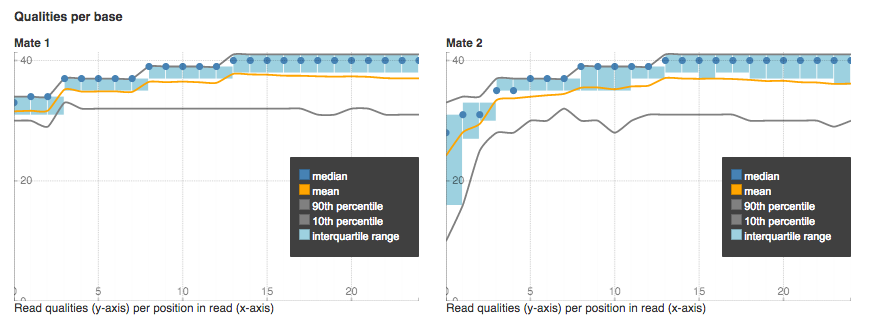
Qualities per base plot shows the range of quality scores for each position on the reads.
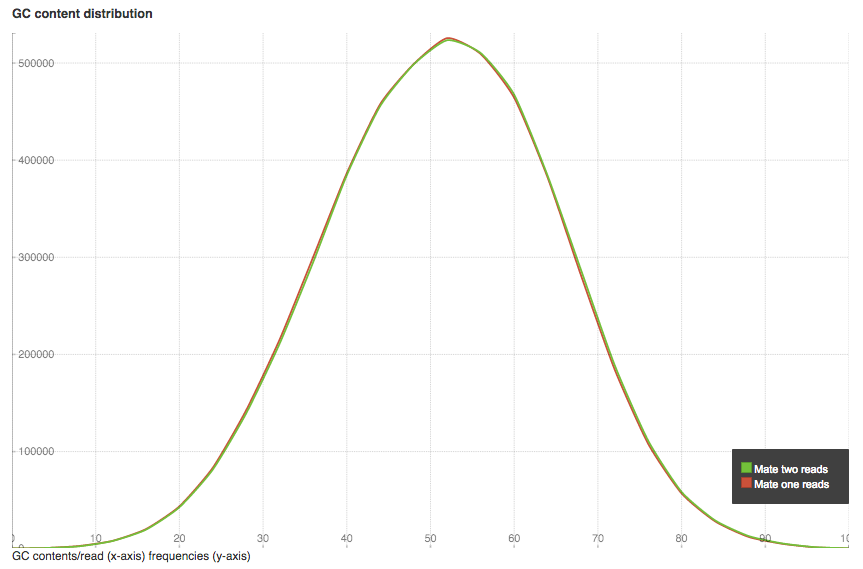
 GC content distribution plot shows GC% (x-axis) and read frequencies (y-axis). In a random library you can expect a roughly normal distribution of GC content, as in our case. An unusually shaped distribution could indicate a contaminated library or some other kinds of biased subset.
You can find more statistics in output Raw Reads QC Reports. We run QC on all the data in the experiment and collected reports in folder Raw Reads QC reports for Trapnell et al. (2012).
2. Mapping RNA-seq reads onto reference genome
On the next step, we'll use Spliced Mapping app to map RNA-seq reads onto the reference genome and discover transcript splice sites. By default, the app will identify both known and novel alternative splicing variants, will align reads with no more than 2 mismatches and report both unique and multiple mappings. Change options and default values, clicking on "Edit parameters" button.
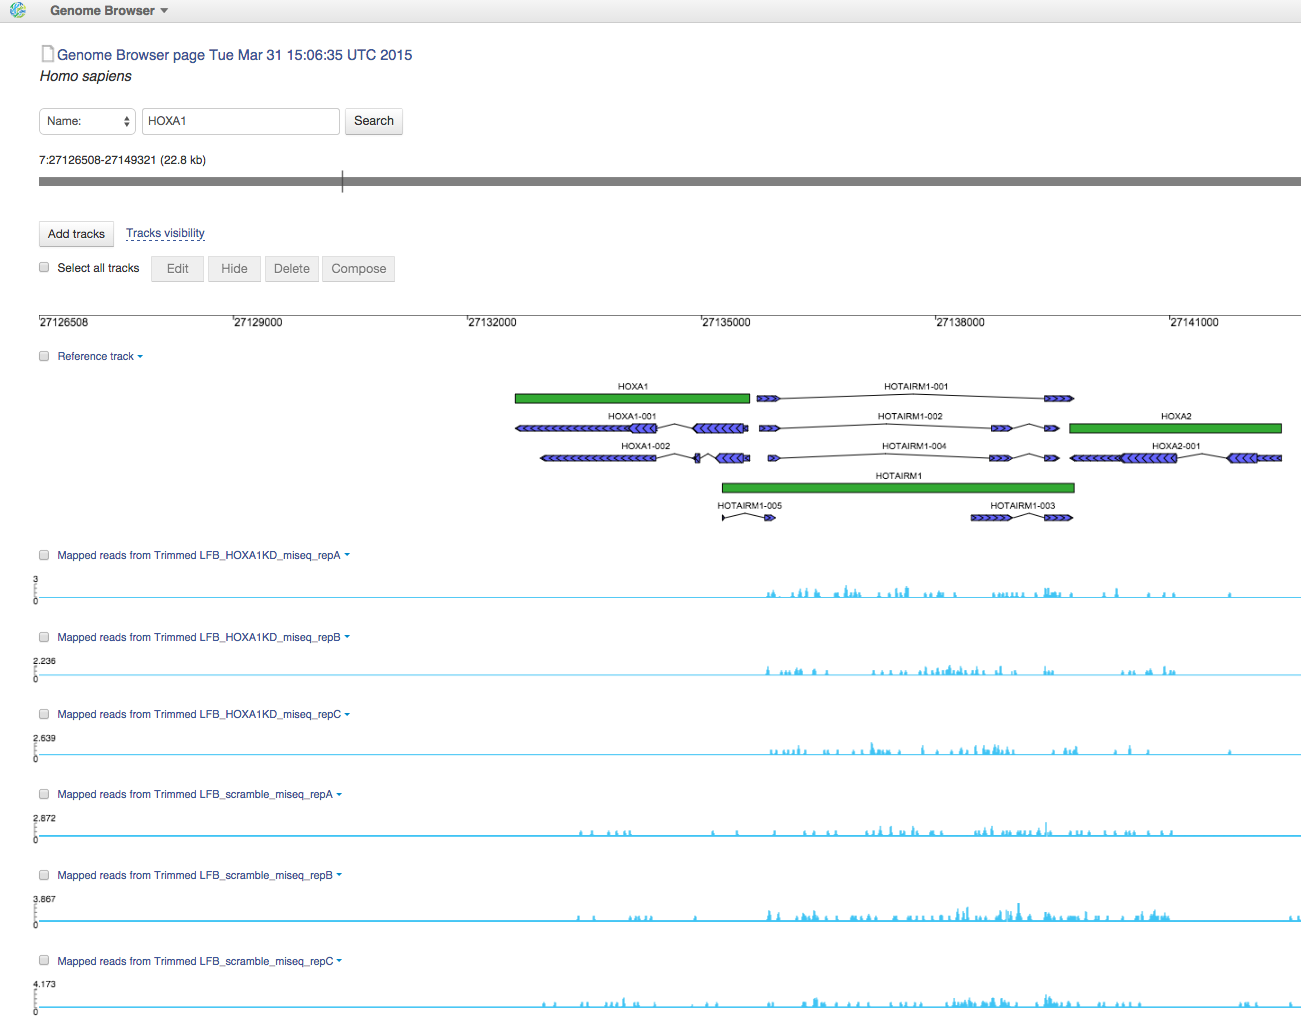
You can find all Mapped Reads files in folder Mapped Reads files for Trapnell et al. (2012). If you open them in Genome Browser, you can find out that HOXA1 gene is really non-transcribed for HOXA1 knockdown data:
3. Quality control of mapped reads
This is an optional step. There are some apps developed for simple quality control of your mapped reads. In this tutorial, let's create QC report for each Mapped Reads file using Mapped Reads QC Report app and then open all reports in Multiple QC plotter app:
All Mapped Reads QC reports are publicly available and stored in folder Mapped Reads QC reports for Trapnell et al. (2012).
4. Calculate FPKM coverage for each isoform
We will run Quantify FPKM Coverage in Isoforms app to calculate isoform abundance. The app takes Mapped Reads file and calculates FPKM (Fragments Per Kilobase of exon per Million fragments mapped) values for each transcript.
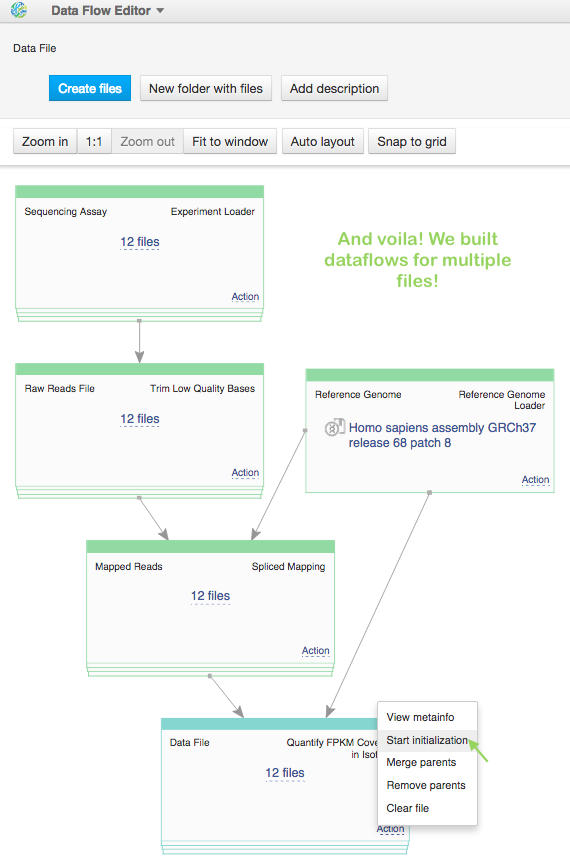
So, now we have pipeline for one sample. Is it possible to run dataflow for multiple samples“ Yes, it's possible. Open FPKM isoform counts file in Data Flow Editor app, for sequencing assay make "Add files" action, choosing the left 11 raw sequencing files and click on blue "Create files" button. Look, we built 12 pipelines! The last thing is just to "start initialization" for all of them.
We calculate FPKM coverage in all samples and collected result files in folder FPKM isoforms counts for Trapnell et al. (2012).
5. Differential isoform expression analysis
The final step is to perform differential isoform expression analysis between two groups of samples corresponding to different conditions. In our case, it is anti-HOXA1 siRNA and scrambled control fibroblasts.
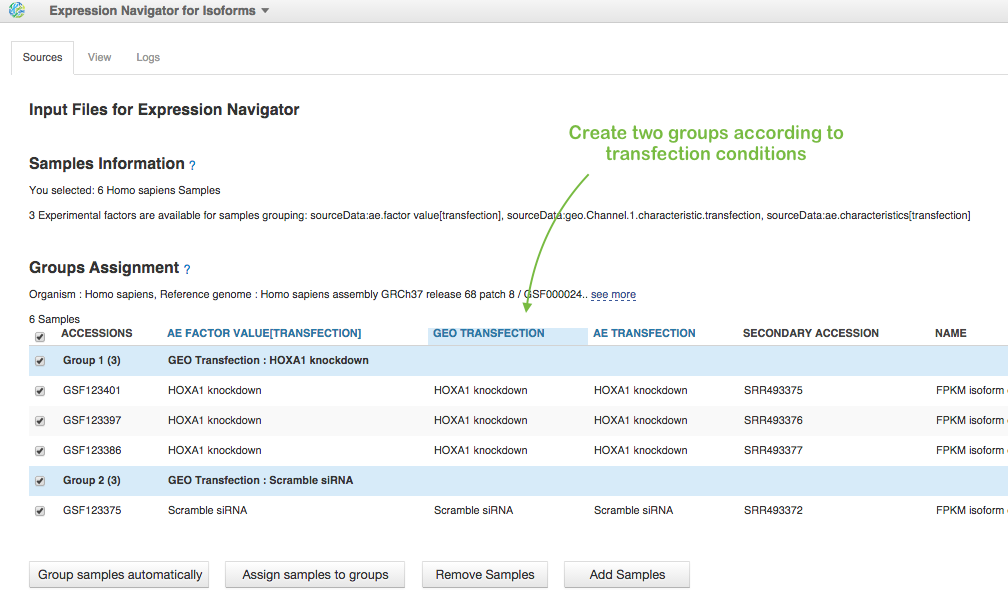
In File Browser, we choose these 6 Data files with FPKM isoforms counts (let's consider only MiSeq data) and click on Test Differential Isoform Expression in Analyse section. To run the app we need to assign samples to groups. We can do it manually or apply auto-grouping. Just click, for example on "GEO transfection" header in the table and the app suggests you to create two groups according to "HOXA1 knockdown" and "Scramble siRNA" transfection conditions:
So, we agree and do "Group samples automatically". Below, you see some correction parameters you can apply for analysis. We will use default values. And finally let's create our file and run the analysis clicking on "start initialization" in "Other Actions". We created two Differential Expression Statistics files (for data from two sequencing platforms - MiSeq and HiSeq) and put them in folder Differential Isoform Expression Analysis for Trapnell et al. (2012).
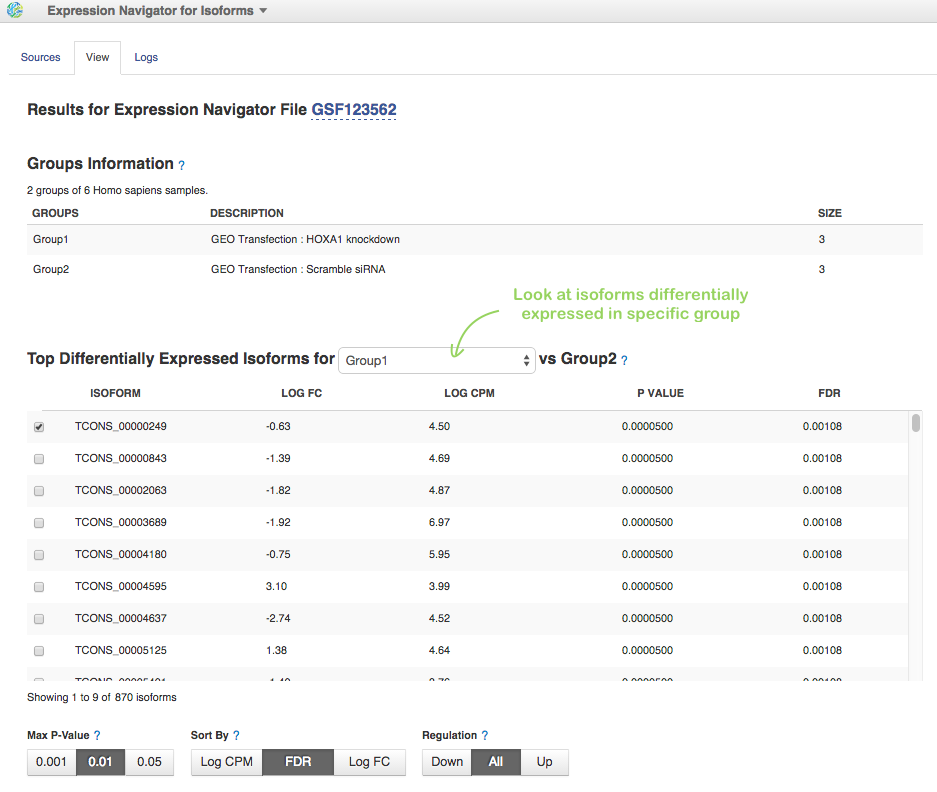
When the analysis will be complete, look at the Top Differentially Expressed Isoforms table. On HiSeq data, more than 800 differentially expressed isoforms (460 up-regulated and 410 down-regulated) were identified:
For selected transcripts, you can see Count Graph with normalised FPKM counts across samples. This allows you to observe how a gene's expression level varies within groups. Look, for example, at first two down-regulated transcripts for HOXA1 knockdown group:
Our results are consistent with paper results. We also found that the loss of HOXA1 results in significant expression level changes for different transcripts encoded by genes which play important role in cell development.
You can find all tutorial files in folder [Tutorial] Testing Differential Isoform Expression on Genestack Platform and look at all results we got for each analytical step.
We wish you good luck in building your own pipelines and hope to get your feedback about Genestack apps and features. Please submit any questions, bugs, comments through green feedback button on the platform or email us at support@genestack.com. See you soon!
